How to create a reusable field search Lightning Web Component

How to create a reusable field search Lightning Web Component

How to create a reusable field search Lightning Web Component

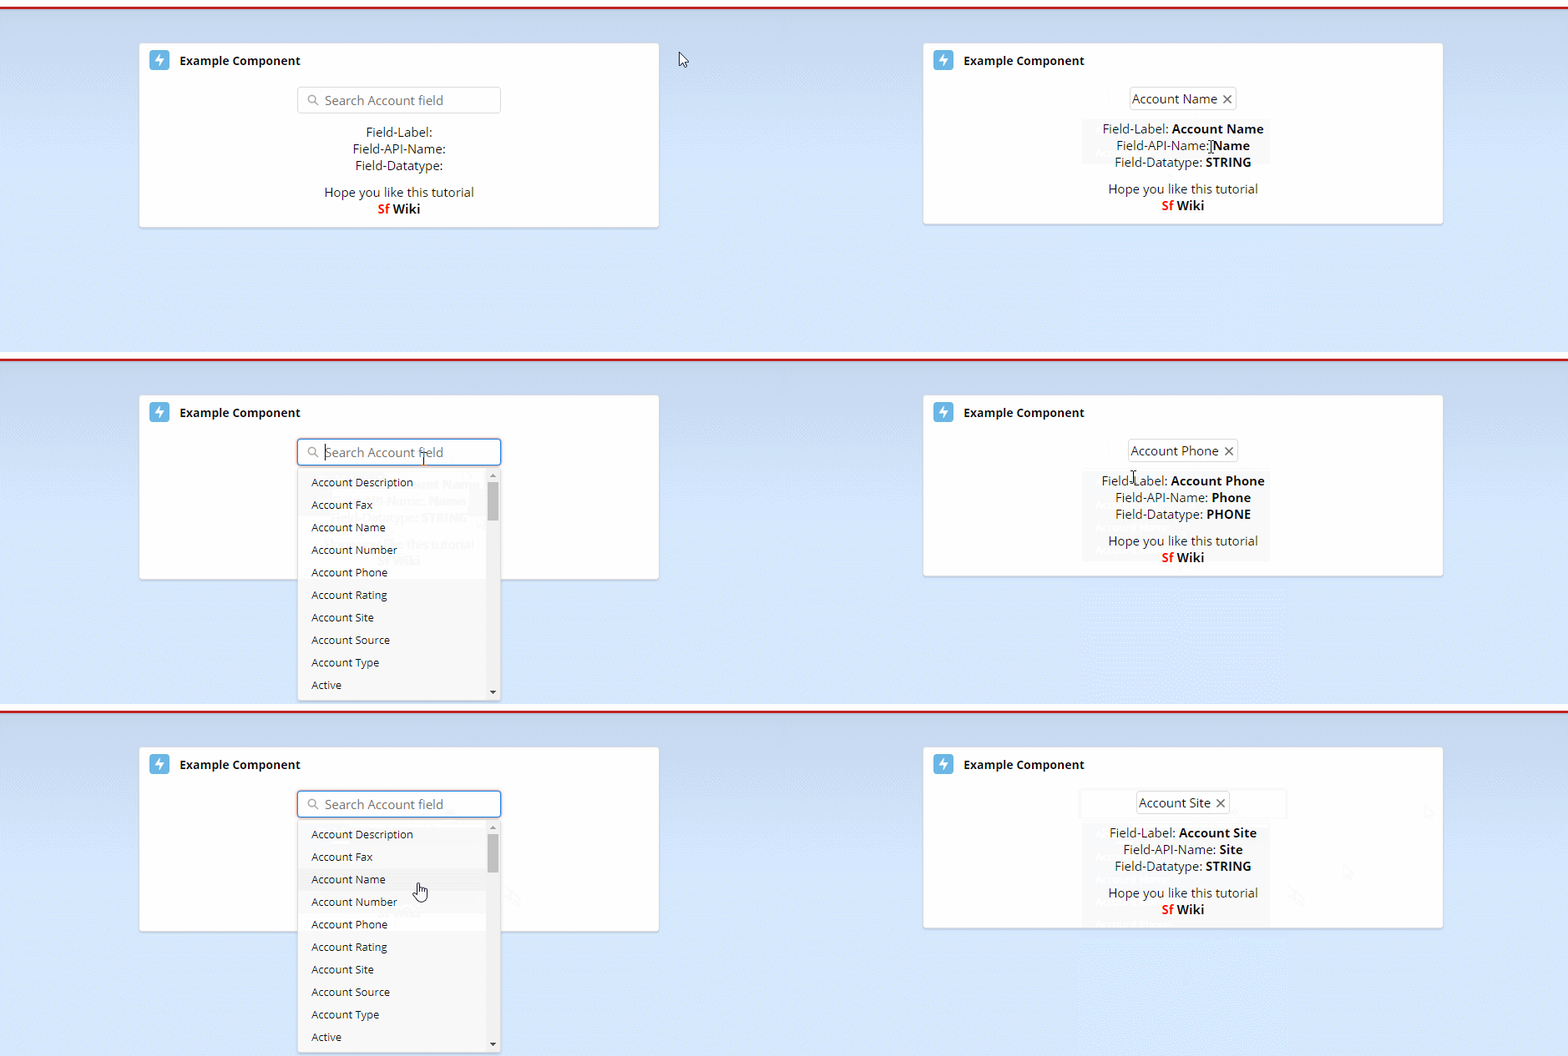
In this tutorial, I will show you how to create a reusable field search Lightning Web Component. In the GIF below you can see the final result.


A brief summary of how the field search Lightning Component works:

      • It has two important parts: a search field and a dropdown suggestion list.
      • The data, in this case all the fields of the Account SObject, is fetched from Apex as a list using the Wire Service.
      • With each letter entered in the search field, the Wire Service fetches from Apex a list of all fields where the entered word occurs as a partial word and displays all found fields.
      • After selecting a field, the dropdown list closes and displays the selected field as a lightning-pill.
How to create a reusable field search Lightning Component

fieldSearch.html

<template>
    <div class="slds-combobox_container">
        <div class={boxClass} aria-expanded="true" aria-haspopup="listbox" role="combobox">
            <div class="slds-combobox__form-element" role="none">
                <template if:true={isValueSelected}>
                    <div class="slds-pill-container">
                        <lightning-pill
                                class="pillSize"
                                label={selectedFieldLabel}
                                onremove={handleRemovePill}
                        >
                        </lightning-pill>
                    </div>
                </template>
                <template if:false={isValueSelected}>
                    <lightning-input
                            class={inputClass}
                            type="search"
                            variant="label-hidden"
                            label=""
                            placeholder={searchPlaceholder}
                            value={searchTerm}
                            onclick={handleClick}
                            onchange={onChange}
                            autocomplete="false"
                    >
                    </lightning-input>
                </template>
            </div>
            <div class="slds-dropdown slds-dropdown_length-with-icon-7 slds-dropdown_fluid" role="listbox">
                <ul class="slds-listbox slds-listbox_vertical" role="presentation">
                    <template for:each={listOfFields} for:item="rec">
                        <li key={rec} data-id={rec.fieldName} data-name={rec.fieldLabel} data-item={rec.fieldType} onclick={onSelect} role="presentation">
                            <span class="slds-lookup__item-action" role="option">
                                <span class="slds-truncate">{rec.fieldLabel}</span>
                            </span>
                        </li>
                    </template>
                </ul>
            </div>
        </div>
    </div>
</template>

fieldSearch.js

import {api, LightningElement, wire} from 'lwc';

import getListOfFields from '@salesforce/apex/SfWiki_Handler.getListOfFields';

export default class FieldSearch extends LightningElement {

    @api searchPlaceholder = "Search";
    @api isValueSelected;
    @api selectedFieldLabel;
    @api sObjectName;

    listOfFields;
    searchTerm;

    //CSS
    boxClass = 'slds-combobox slds-dropdown-trigger slds-dropdown-trigger_click slds-has-focus';
    inputClass = '';

    @wire(getListOfFields, {sObjectName: '$sObjectName', searchTerm : '$searchTerm'})
    wiredRecords({ error, data }) {
        if (data) {
            let listOfFields = [];
            for(let i = 0; i < data.length; i++) {
                let tempRecord = Object.assign({}, data[i]); //cloning object
                listOfFields.push(tempRecord);
            }
            listOfFields.sort(this.compare);
            this.listOfFields = listOfFields;
        } else if (error) {
            console.log(error);
        }
    }

    handleClick() {
        this.searchTerm = '';
        this.inputClass = 'slds-has-focus';
        this.boxClass = 'slds-combobox slds-dropdown-trigger slds-dropdown-trigger_click slds-has-focus slds-is-open';
    }

    onSelect(event) {
        let selectedFieldApiName = event.currentTarget.dataset.id;
        this.selectedFieldLabel = event.currentTarget.dataset.name;
        let selectedFieldType = event.currentTarget.dataset.item;
        const valueSelectedEvent = new CustomEvent('fieldselected', {
            detail: {
                selectedFieldApiName: selectedFieldApiName,
                selectedFieldType: selectedFieldType,
                selectedFieldLabel: this.selectedFieldLabel,
            }});
        this.dispatchEvent(valueSelectedEvent);
        this.isValueSelected = true;
        this.boxClass = 'slds-combobox slds-dropdown-trigger slds-dropdown-trigger_click slds-has-focus';
    }

    handleRemovePill() {
        this.isValueSelected = false;
    }

    onChange(event) {
        this.searchTerm = event.target.value;
    }

    /**
     * This function compares two fields (for sorting purposes) with each other
     */
    compare(a, b) {
        // Use toUpperCase() to ignore character casing
        const fieldLabelA = a.fieldLabel.toUpperCase();
        const fieldLabelB = b.fieldLabel.toUpperCase();

        let comparison = 0;
        if (fieldLabelA > fieldLabelB) {
            comparison = 1;
        } else if (fieldLabelA < fieldLabelB) {
            comparison = -1;
        }
        return comparison;
    }

}

Ctrl_fieldSearch.cls

public without sharing class SfWiki_Handler {

    @AuraEnabled(Cacheable=true)
    public static List<Fields> getListOfFields(String sObjectName, String searchTerm) {
        List<Fields> listOfFields = new List<Fields>();

        Map<String, Schema.SObjectType> schemaMap = Schema.getGlobalDescribe();
        Map<String, Schema.SObjectField> fieldMap = schemaMap.get(sObjectName).getDescribe().fields.getMap();

        for(String fieldName : fieldMap.keySet()) {
            //We don't want to search for fields with these data-types: ADDRESS, REFERENCE, ID & URL
            if(String.valueOf(fieldMap.get(fieldName).getDescribe().getType()) != 'ADDRESS'
                    && String.valueOf(fieldMap.get(fieldName).getDescribe().getType()) != 'REFERENCE'
                    && String.valueOf(fieldMap.get(fieldName).getDescribe().getType()) != 'ID'
                    && String.valueOf(fieldMap.get(fieldName).getDescribe().getType()) != 'URL') {
                if(String.valueOf(fieldMap.get(fieldName).getDescribe().getLabel().toLowerCase()).contains(searchTerm.toLowerCase())) {
                    Fields newFieldProperties = new Fields();
                    newFieldProperties.fieldLabel = fieldMap.get(fieldName).getDescribe().getLabel();
                    newFieldProperties.fieldName = fieldMap.get(fieldName).getDescribe().getName();
                    newFieldProperties.fieldType = String.valueOf(fieldMap.get(fieldName).getDescribe().getType());
                    listOfFields.add(newFieldProperties);
                }
            }

        }

        return listOfFields;
    }

    public class Fields {
        @AuraEnabled
        public String fieldLabel { get; set; }
        @AuraEnabled
        public String fieldName { get; set; }
        @AuraEnabled
        public String fieldType { get; set; }
    }

}

That’s it!

I hope you have enjoyed learning “How to create a reusable field search Lightning Web Component”. Please share your thoughts in the comments below. If you find value in this type of post, please subscribe because we have tons of tutorials in progress to be posted!

How to assign Profile User to a Permission Set in Apex

How to assign Profile User to a Permission Set in Apex?It often happens that one of my...

How to create a reusable field search Lightning Web Component

How to create a reusable field search Lightning Web ComponentIn this tutorial, I will show you how...

How to create a reusable Lookup Lightning Component [LWC]

In this tutorial, I will show you how to create a reusable Lookup Lightning Component in Lightning Web Components.

How to remove Lightning App Page Header [LWC]

In this tutorial, I will show you how to remove Lightning App Page Header in Lightning Web Components.

How to add or remove rows dynamically [LWC]

In this tutorial, I will show you how to add or remove rows dynamically in Lightning Web Components.

Leave a comment!

How to create a reusable field search Lightning Web Component

How to create a reusable Lookup Lightning Component [LWC]

Icon for the Lightning Components topic

How to create a reusable Lookup Lightning Component [LWC]

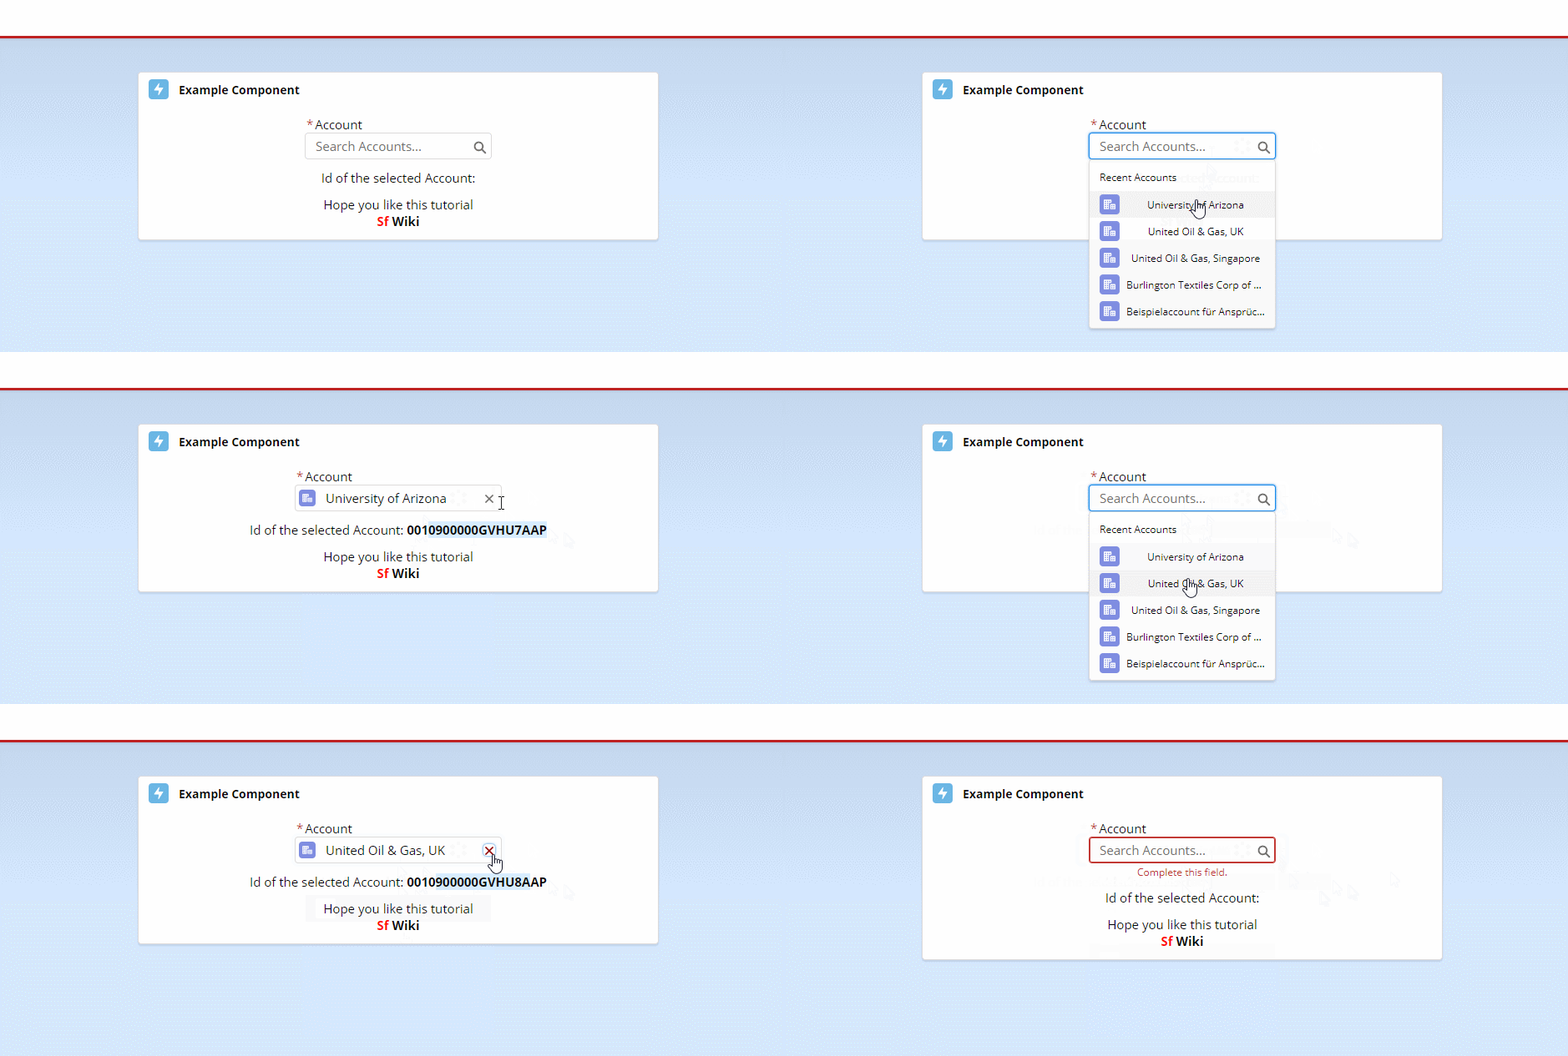
In this tutorial, I will show you how to create a reusable Lookup Lightning Component using Lightning Web Components. In the GIF below you can see the final result.

How to create a reusable Lookup Lightning Component

A brief summary of how the Lookup Lightning Component works:

  • We use “lightning-record-edit-form” to access the fields of the Contact Object.
  • Inside “lightning-record-edit-form” we use a “lightning-input-field” to access the “AccountId” field of the Contact Object.
  • So we have a 1:1 representation of the Account Lookup field that is on the Contact Object.
  • When an Account is selected, the Id of the Account is sent to the Parent Component via a Component Event and packed into the Recent List.

lwcLookupComponent.html

<template>
    <lightning-record-edit-form object-api-name={childObjectApiName}>
        <div class="slds-form-element">
            <label class="slds-float_left"><abbr if:true={required} title="required" class="slds-required">*</abbr>{fieldLabel}</label>
            <div class="slds-form-element__control">
                <lightning-input-field
                        variant={variant}
                        field-name={targetFieldApiName}
                        value={value}
                        required={required}
                        onchange={handleChange}
                >
                </lightning-input-field>
            </div>
        </div>
    </lightning-record-edit-form>
</template>

lwcLookupComponent.js

import { LightningElement, api } from 'lwc';
import addToRecentItems from '@salesforce/apex/SfWiki_Handler.setObjectToRecentItems';

export default class LwcLookupComponent extends LightningElement {

    @api name;
    @api variant = "label-hidden";
    @api fieldLabel;
    @api childObjectApiName;
    @api targetFieldApiName;
    @api value;
    @api required = false;
    @api addToRecent = false;

    handleChange(event) {
        let selectedEvent = new CustomEvent('valueselected', {detail: event.detail.value[0]});
        this.dispatchEvent(selectedEvent);

        if (this.addToRecent) {
            if (event.detail.value.length > 0 && event.detail.value[0].length > 0) {
                addToRecentItems({
                    recordId: event.detail.value[0]
                })
                    .catch(error => {
                        console.log(error);
                    });
            }
        }
    }

    @api reportValidity() {
        if(this.required) {
            this.template.querySelector('lightning-input-field').reportValidity();
        }
    }

}

SfWiki_Handler.cls

public without sharing class SfWiki_Handler {

    @AuraEnabled
    public static void setObjectToRecentItems(Id recordId) {
        if (!String.isBlank(recordId)) {
            Schema.SObjectType sObjectType = recordId.getSobjectType();
            String queryString = String.format('SELECT Id, Name FROM {0} WHERE Id =: recordId FOR VIEW', new List<Object>{sObjectType});
            Database.query(queryString);
        }
    }

}

Example how to use

lwcExampleComponent.html

<template>

    <div class="slds-card" style="font-family: 'Open Sans', sans-serif">

        <!-- Header -->
        <header class="slds-card__header slds-media slds-media_center">
            <div class="slds-media__figure">
                <lightning-icon icon-name="standard:custom_notification" size="small"></lightning-icon>
            </div>
            <div class="slds-media__body slds-card__header-title slds-text-title_bold" style="font-size: 14px">
                Example Component
            </div>
        </header>

        <!-- Body -->
        <div class="slds-p-around_small">
            <div class="slds-text-align_center slds-container_center" style="font-size: 15px;">
                <div class="slds-size_2-of-3 slds-align_absolute-center slds-p-bottom_small">
                    <c-lwc-lookup-component
                            name="accountLookup"
                            field-label="Account"
                            child-object-api-name="Contact"
                            target-field-api-name="AccountId"
                            value={accountId}
                            required="false"
                            add-to-recent="true"
                            onvalueselected={handleSelectedLookup}
                    >
                    </c-lwc-lookup-component>
                </div>
                <p>Id of the selected Account: <span style="font-weight: bold">{accountId}</span></p>
                <p class="slds-p-top_small">Hope you like this tutorial</p>
                <p style="font-weight: bold; color: red">Sf <span style="font-weight: bold; color: black">Wiki</span></p>
            </div>
        </div>

    </div>

</template>

lwcExampleComponent.js

import {LightningElement} from 'lwc';

export default class LwcExampleComponent extends LightningElement {

    accountId;

    handleSelectedLookup(event) {
        this.accountId = event.detail;
    }

}

That’s it!

I hope you have enjoyed learning “How to create a reusable Lookup Lightning Component [LWC]”. Please share your thoughts in the comments below. If you find value in this type of post, please subscribe because we have tons of tutorials in progress to be posted!
If you prefer to see the result with Lightning Aura Components, here’s the link to it: How to create a reusable Lookup Lightning Component [Aura].

How to assign Profile User to a Permission Set in Apex

How to assign Profile User to a Permission Set in Apex?It often happens that one of my customers wants to have a new permission set created and at the same time wants the users of one or more profiles assigned to this new permission set. This is easily done...

How to create a reusable field search Lightning Web Component

How to create a reusable field search Lightning Web ComponentIn this tutorial, I will show you how to create a reusable field search Lightning Web Component. In the GIF below you can see the final result.   A brief summary of how the field search Lightning...

How to create a reusable Lookup Lightning Component [LWC]

In this tutorial, I will show you how to create a reusable Lookup Lightning Component in Lightning Web Components.

How to remove Lightning App Page Header [LWC]

In this tutorial, I will show you how to remove Lightning App Page Header in Lightning Web Components.

How to add or remove rows dynamically [LWC]

In this tutorial, I will show you how to add or remove rows dynamically in Lightning Web Components.

Leave a comment!

Hamid Abassi

Hamid Abassi

SfWiki Founder

I am a Salesforce Developer from Hamburg who wants to help the Salesforce Community around the world with my tutorials. Feel free to explore my website and hopefully learn something new.

How to create a reusable field search Lightning Web Component

How to remove Lightning App Page Header [LWC]

Icon for the Lightning Components topic

How to remove Lightning App Page Header [LWC]

In this tutorial, I will show you how to remove Lightning App Page Header using Lightning Web Components and CSS. In the images below you can see the final result.

Before

Remove Lightning App Page Header

After

Remove Lightning App Page Header

Create a CSS-File and paste the “noHeader.resource” Code-Snippet. Then create a Static Resource and upload it.

noHeader.resource

.slds-page-header.header.flexipageHeader {
    display: none;
}

exampleComponent.js

import {LightningElement} from 'lwc';

//Import your CSS-File from the Static Resources
import noHeader from '@salesforce/resourceUrl/NoHeader';
//Import loadStyle-Method
import {loadStyle} from "lightning/platformResourceLoader";

export default class LwcExampleComponent extends LightningElement {

    connectedCallback() {
        loadStyle(this, noHeader)
            .then(result => {});
    }

}

That’s it!

I hope you have enjoyed learning “How to remove Lightning App Page Header [LWC]”. Please share your thoughts in the comments below. If you find value in this type of post, please subscribe because we have tons of tutorials in progress to be posted!
If you prefer to see the result with Lightning Aura Components, here’s the link to it: How to remove Lightning App Page Header [Aura].

How to assign Profile User to a Permission Set in Apex

How to assign Profile User to a Permission Set in Apex?It often happens that one of my customers wants to have a new permission set created and at the same time wants the users of one or more profiles assigned to this new permission set. This is easily done...

How to create a reusable field search Lightning Web Component

How to create a reusable field search Lightning Web ComponentIn this tutorial, I will show you how to create a reusable field search Lightning Web Component. In the GIF below you can see the final result.   A brief summary of how the field search Lightning...

How to create a reusable Lookup Lightning Component [LWC]

In this tutorial, I will show you how to create a reusable Lookup Lightning Component in Lightning Web Components.

How to remove Lightning App Page Header [LWC]

In this tutorial, I will show you how to remove Lightning App Page Header in Lightning Web Components.

How to add or remove rows dynamically [LWC]

In this tutorial, I will show you how to add or remove rows dynamically in Lightning Web Components.

Leave a comment!

Hamid Abassi

Hamid Abassi

SfWiki Founder

I am a Salesforce Developer from Hamburg who wants to help the Salesforce Community around the world with my tutorials. Feel free to explore my website and hopefully learn something new.

How to create a reusable field search Lightning Web Component

How to add or remove rows dynamically [LWC]

Icon for the Lightning Components topic

How to add or remove rows dynamically [LWC]

In this tutorial, I will show you how to add or remove rows dynamically using Lightning Web Components. In the GIF below you can see the final result.

How to add or remove rows dynamically in Lightning Components

lwcDynamicRecordRowsCreation.html

<template>

    <div class="slds-card" style="font-family: 'Open Sans', sans-serif">

        <!-- Header -->
        <header class="slds-card__header slds-media slds-media_center">
            <div class="slds-media__figure">
                <lightning-icon icon-name="standard:account" size="small"></lightning-icon>
            </div>
            <div class="slds-media__body slds-card__header-title slds-text-title_bold" style="font-size: 14px">
                Account Creation
            </div>
        </header>

        <!-- Table -->
        <table class="slds-table slds-table_bordered slds-no-row-hover slds-table_cell-buffer" role="grid">
            <thead>
            <tr>
                <th scope="col" height="22" style="width: 3rem">Nr.</th>
                <th scope="col" height="22">Name</th>
                <th scope="col" height="22">Website</th>
                <th scope="col" height="22">Phone</th>
                <th scope="col" height="22" style="width: 3rem"></th>
            </tr>
            </thead>
            <tbody>
            <template for:each={listOfAccounts} for:item="rec">
                <tr key={rec} class="slds-hint-parent">
                    <td style="font-weight: bold">
                        <lightning-formatted-number value={rec.index}></lightning-formatted-number>.
                    </td>

                    <td>
                        <lightning-input type="text" variant="label-hidden" label="" data-id={rec.index} name="Name" value={rec.Name} onchange={handleInputChange}></lightning-input>
                    </td>

                    <td>
                        <lightning-input type="text" variant="label-hidden" label="" data-id={rec.index} name="Website" value={rec.Website} onchange={handleInputChange}></lightning-input>
                    </td>

                    <td>
                        <lightning-input type="text" variant="label-hidden" label="" data-id={rec.index} name="Phone" value={rec.Phone} onchange={handleInputChange}></lightning-input>
                    </td>

                    <td>
                        <lightning-button-icon icon-name="utility:delete" alternative-text="Remove" title="Remove" name={rec.index} onclick={removeRow}></lightning-button-icon>
                    </td>
                </tr>
            </template>
            </tbody>
        </table>
        <div class="slds-p-left_small slds-p-vertical_small">
            <lightning-button class="slds-p-right_small" variant="destructive" label="delete all rows" title="delete all rows" icon-name="utility:recycle_bin_full" onclick={removeAllRows}></lightning-button>
            <lightning-button variant="neutral" label="add additional row" title="add additional row" icon-name="utility:add" onclick={addNewRow}></lightning-button>
        </div>

        <!-- Footer -->
        <footer class="slds-modal__footer" style="padding: 0.50rem 1rem;">
            <lightning-button icon-name="utility:save" variant="brand" label="Create Accounts" title="Create Accounts" onclick={createAccounts}></lightning-button>
        </footer>
    </div>

</template>

lwcDynamicRecordRowsCreation.js

import {LightningElement, track} from 'lwc';

//APEX-Methods
import insertAccounts from '@salesforce/apex/SfWiki_Handler.insertAccounts'
import {ShowToastEvent} from "lightning/platformShowToastEvent";

export default class LwcDynamicRecordRowsCreation extends LightningElement {

    @track listOfAccounts;

    connectedCallback() {
        this.initData();
    }

    initData() {
        let listOfAccounts = [];
        this.createRow(listOfAccounts);
        this.listOfAccounts = listOfAccounts;
    }

    createRow(listOfAccounts) {
        let accountObject = {};
        if(listOfAccounts.length > 0) {
            accountObject.index = listOfAccounts[listOfAccounts.length - 1].index + 1;
        } else {
            accountObject.index = 1;
        }
        accountObject.Name = null;
        accountObject.Website = null;
        accountObject.Phone = null;
        listOfAccounts.push(accountObject);
    }

    /**
     * Adds a new row
     */
    addNewRow() {
        this.createRow(this.listOfAccounts);
    }

    /**
     * Removes the selected row
     */
    removeRow(event) {
        let toBeDeletedRowIndex = event.target.name;

        let listOfAccounts = [];
        for(let i = 0; i < this.listOfAccounts.length; i++) {
            let tempRecord = Object.assign({}, this.listOfAccounts[i]); //cloning object
            if(tempRecord.index !== toBeDeletedRowIndex) {
                listOfAccounts.push(tempRecord);
            }
        }

        for(let i = 0; i < listOfAccounts.length; i++) {
            listOfAccounts[i].index = i + 1;
        }

        this.listOfAccounts = listOfAccounts;
    }

    /**
     * Removes all rows
     */
    removeAllRows() {
        let listOfAccounts = [];
        this.createRow(listOfAccounts);
        this.listOfAccounts = listOfAccounts;
    }

    handleInputChange(event) {
        let index = event.target.dataset.id;
        let fieldName = event.target.name;
        let value = event.target.value;

        for(let i = 0; i < this.listOfAccounts.length; i++) {
            if(this.listOfAccounts[i].index === parseInt(index)) {
                this.listOfAccounts[i][fieldName] = value;
            }
        }
    }

    createAccounts() {
        insertAccounts({
            jsonOfListOfAccounts: JSON.stringify(this.listOfAccounts)
        })
            .then(data => {
                this.initData();
                let event = new ShowToastEvent({
                    message: "Accounts successfully created!",
                    variant: "success",
                    duration: 2000
                });
                this.dispatchEvent(event);
            })
            .catch(error => {
                console.log(error);
            });
    }

}

SfWiki_Handler.cls

public without sharing class SfWiki_Handler {

    @AuraEnabled
    public static void insertAccounts(String jsonOfListOfAccounts) {
        List<Account> listOfAccounts = (List<Account>) JSON.deserialize(jsonOfListOfAccounts, List<Account>.class);
        insert listOfAccounts;
    }

}

That’s it!

I hope you have enjoyed learning “How to add or remove rows dynamically [LWC]”. Please share your thoughts in the comments below. If you find value in this type of post, please subscribe because we have tons of tutorials in progress to be posted!

If you prefer to see the result with Lightning Aura Components, here’s the link to it: How to add or remove rows dynamically [Aura].

How to assign Profile User to a Permission Set in Apex

How to assign Profile User to a Permission Set in Apex?It often happens that one of my customers wants to have a new permission set created and at the same time wants the users of one or more profiles assigned to this new permission set. This is easily done...

How to create a reusable field search Lightning Web Component

How to create a reusable field search Lightning Web ComponentIn this tutorial, I will show you how to create a reusable field search Lightning Web Component. In the GIF below you can see the final result.   A brief summary of how the field search Lightning...

How to create a reusable Lookup Lightning Component [LWC]

In this tutorial, I will show you how to create a reusable Lookup Lightning Component in Lightning Web Components.

How to remove Lightning App Page Header [LWC]

In this tutorial, I will show you how to remove Lightning App Page Header in Lightning Web Components.

How to add or remove rows dynamically [LWC]

In this tutorial, I will show you how to add or remove rows dynamically in Lightning Web Components.

Leave a comment!

Hamid Abassi

Hamid Abassi

SfWiki Founder

I am a Salesforce Developer from Hamburg who wants to help the Salesforce Community around the world with my tutorials. Feel free to explore my website and hopefully learn something new.

How to create a reusable field search Lightning Web Component

How to navigate through Lightning Components [LWC]

Icon for the Lightning Components topic

How to navigate through Lightning Components [LWC]

In this tutorial, I will show you how to navigate through Lightning Components using Lightning Web Components. In the GIF below you can see the final result.

Navigate through Lightning Components [LWC]

lwcNavigateThroughComponents.html

<template>

    <div class="slds-card slds-m-horizontal_large" style="font-family: 'Open Sans', sans-serif">

        <!-- Spinner -->
        <template if:true={showSpinner}>
            <div class="slds-is-relative slds-m-around_large slds-align_absolute-center" style="min-height: 300px; !important;">
                <lightning-spinner alternative-text="Loading..." variant="brand"></lightning-spinner>
            </div>
        </template>

        <template if:false={showSpinner}>
            <!-- Header -->
            <div class="slds-card__header slds-p-bottom_small">
                <header>
                    <lightning-progress-indicator current-step={step} type="path" variant="base" has-error="false">
                        <lightning-progress-step label="First Page" value="1" onclick={nextPage}></lightning-progress-step>
                        <lightning-progress-step label="Second Page" value="2" onclick={nextPage}></lightning-progress-step>
                        <lightning-progress-step label="Third Page" value="3" onclick={nextPage}></lightning-progress-step>
                    </lightning-progress-indicator>
                </header>
            </div>

            <!-- First Page -->
            <template if:true={showFirstPage}>
                <div class="slds-scrollable_y" style="max-height: 600px; !important;">
                    <lightning-datatable key-field="Id"
                                         data={listOfAccounts}
                                         columns={accountColumns}
                                         show-row-number-column="true"
                    >
                    </lightning-datatable>
                </div>
            </template>

            <!-- Second Page -->
            <template if:true={showSecondPage}>
                <div class="slds-p-around_small">
                    <div class="slds-text-align_center slds-container_center" style="font-size: 15px;">
                        <p>This is the second Page</p>
                        <p>Hope you like this tutorial</p>
                        <p style="font-weight: bold; color: red">Sf <span style="font-weight: bold; color: black">Wiki</span></p>
                    </div>
                </div>
            </template>

            <!-- Third Page -->
            <template if:true={showThirdPage}>
                <lightning-datatable key-field="Id"
                                     data={listOfContacts}
                                     columns={contactColumns}
                                     show-row-number-column="true"
                >
                </lightning-datatable>
            </template>

            <!-- Footer -->
            <footer class="slds-modal__footer slds-align_absolute-center" style="padding: 0.50rem 1rem;">
                <template if:true={showFirstPage}>
                    <lightning-button label="Next" variant="neutral" value="2" onclick={nextPage}></lightning-button>
                </template>
                <template if:true={showSecondPage}>
                    <lightning-button class="slds-p-right_xx-small" label="Previous" variant="neutral" value="1" onclick={previousPage}></lightning-button>
                    <lightning-button label="Next" variant="neutral" value="3" onclick={nextPage}></lightning-button>
                </template>
                <template if:true={showThirdPage}>
                    <lightning-button class="slds-p-right_xx-small" label="Previous" variant="neutral" value="2" onclick={previousPage}></lightning-button>
                    <lightning-button label="Save" variant="brand"></lightning-button>
                </template>
            </footer>
        </template>

    </div>

</template>

lwcNavigateThroughComponents.js

import {LightningElement} from 'lwc';

//APEX-Methods
import getAccounts from '@salesforce/apex/SfWiki_Handler.getAccounts'
import getContacts from '@salesforce/apex/SfWiki_Handler.getContacts'

export default class LwcNavigateThroughComponents extends LightningElement {

    step;
    showSpinner;

    //First Page
    showFirstPage = true;
    listOfAccounts;
    accountColumns = [
        {label: 'Name', fieldName: 'Name', type: 'text', sortable: true, wrapText: false, hideDefaultActions: true},
        {label: 'Phone', fieldName: 'Phone', type: 'text', sortable: true, wrapText: false, hideDefaultActions: true},
        {label: 'Website', fieldName: 'Website', type: 'text', sortable: true, wrapText: false, hideDefaultActions: true},
        {label: 'Industry', fieldName: 'Industry', type: 'text', sortable: true, wrapText: false, hideDefaultActions: true},
        {label: 'Annual Revenue', fieldName: 'AnnualRevenue', type: 'currency', sortable: false, wrapText: false, hideDefaultActions: true,
            typeAttributes: {minimumFractionDigits: 2, maximumFractionDigits: 2},
            cellAttributes: {alignment: "left"}}
    ];

    //Second Page
    showSecondPage;

    //Third Page
    showThirdPage;
    listOfContacts;
    contactColumns = [
        {label: 'Name', fieldName: 'Name', type: 'text', sortable: true, wrapText: false, hideDefaultActions: true},
        {label: 'Title', fieldName: 'Title', type: 'text', sortable: true, wrapText: false, hideDefaultActions: true},
        {label: 'Phone', fieldName: 'Phone', type: 'text', sortable: true, wrapText: false, hideDefaultActions: true},
        {label: 'Email', fieldName: 'Email', type: 'text', sortable: true, wrapText: false, hideDefaultActions: true},
        {label: 'Department', fieldName: 'Department', type: 'text', sortable: true, wrapText: false, hideDefaultActions: true}
    ];

    connectedCallback() {
        this.getInitData();
    }

    getInitData() {
        this.showSpinner = true;
        getAccounts({})
            .then(data => {
                this.listOfAccounts = data;
                this.showSpinner = false;
            })
            .catch(error => {
                console.log(error);
            });
    }

    nextPage(event) {
        this.setAllStepsToFalse();
        this.step = event.target.value;

        if(this.step === "1") {
            this.showFirstPage = true;
        } else if(this.step === "2") {
            this.showSecondPage = true;
        } else if(this.step === "3") {
            this.showSpinner = true;
            getContacts({})
                .then(data => {
                    this.listOfContacts = data;
                    this.showSpinner = false;
                    this.showThirdPage = true;
                })
                .catch(error => {
                    console.log(error);
                });
        }

    }

    previousPage(event) {
        this.setAllStepsToFalse();
        this.step = event.target.value;

        if(this.step === "1") {
            this.showFirstPage = true;
        } else if(this.step === "2") {
            this.showSecondPage = true;
        }
    }

    setAllStepsToFalse() {
        this.showFirstPage = false;
        this.showSecondPage = false;
        this.showThirdPage = false;
    }

}

SfWiki_Handler.cls

public without sharing class SfWiki_Handler {

    @AuraEnabled
    public static List<Account> getAccounts() {
        return [SELECT Id, Name, Phone, Website, Industry, AnnualRevenue FROM Account LIMIT 10];
    }

    @AuraEnabled
    public static List<Contact> getContacts() {
        return [SELECT Id, Name, Title, Phone, Email, Department FROM Contact LIMIT 10];
    }

}

That’s it!

I hope you have enjoyed learning “How to navigate through Lightning Components using Lightning Web Components”. Please share your thoughts in the comments below. If you find value in this type of post, please subscribe because we have tons of tutorials in progress to be posted!

If you prefer to see the result with Lightning Aura Components, here’s the link to it: How to navigate through Lightning Components [Aura].

How to assign Profile User to a Permission Set in Apex

How to assign Profile User to a Permission Set in Apex?It often happens that one of my customers wants to have a new permission set created and at the same time wants the users of one or more profiles assigned to this new permission set. This is easily done...

How to create a reusable field search Lightning Web Component

How to create a reusable field search Lightning Web ComponentIn this tutorial, I will show you how to create a reusable field search Lightning Web Component. In the GIF below you can see the final result.   A brief summary of how the field search Lightning...

How to create a reusable Lookup Lightning Component [LWC]

In this tutorial, I will show you how to create a reusable Lookup Lightning Component in Lightning Web Components.

How to remove Lightning App Page Header [LWC]

In this tutorial, I will show you how to remove Lightning App Page Header in Lightning Web Components.

How to add or remove rows dynamically [LWC]

In this tutorial, I will show you how to add or remove rows dynamically in Lightning Web Components.

Leave a comment!

Hamid Abassi

Hamid Abassi

SfWiki Founder

I am a Salesforce Developer from Hamburg who wants to help the Salesforce Community around the world with my tutorials. Feel free to explore my website and hopefully learn something new.